This installment isl la game-cyhanger as a landmark article on how technology can literally change the way we teach. For example, our music ensemble’s instruction can be customized for nearly every student’s individual needs along with a well-designed path for enhancing practicing habits with full assessment capabilities that incorporate individual solo & ensemble literature, method books, technical exercises, other instruction simultaneously, and more. The secret for this innovative curriculum goes far beyond individual music software applications by incorporating Power-User applications that can be utilized in tandem to accomplish differentiated-instruction materials for every teacher. The secret to creating music projects with the Power-User concept is in converting files that can be used to transfer data across different software apps for enhanced instruction through MusicXML.
There are three main components of this Power-User Synthesis process: 1) Music scanning is the conversion of printed music to digital music files, 2) notation editing to customize the music for student practicing in a variety of notation applications and 3) exporting projects into SmartMusic for its ultimate home/school practicing for full evaluation and communication back to the student and interaction for further motivation. All within a timely and convenient manner.
The focus of this installment is to provide tips, tricks and techniques for music scanning, notation software editing, and the implantation of SmartMusic practice files in the classroom: marching band music, college honor band auditions, wind ensemble, symphonic band, orchestra, All-State auditions, solo & ensemble, jazz band,and other compositions. Through this Power-User technique, music teachers are able create assignments of the music that they are actually teaching/performing along with assessment recordings, note and rhythm accuracy, plus a unique way to improve intonation all resulting in dynamic interactiveness between teacher and students. This creates a first-class teaching environment that will improve performance techniques for an unlimited repertory that could never be duplicated with traditional, segmented instruction without tedious efforts of the teacher.
Music OCR Scanning: Improved Frontier Because….!
Music scanning (OCR) is the equivalent of a text OCR program that can digitize printed music into musical notation for editing, printing and playback purposes going far beyond the printed music. It is also able to convert PDF files to editable and playable notation. Music scanning technology began with limitations and inaccuracies two decades ago, but in 2014, music scanning technology has become so sophisticated that music compositions can be created in MusicXML format incredibly quick and with a high degree of accuracy. Today’s market of music OCR commonly yields well into the 90% and beyond accuracy which requires a minimum of notation editing for a finished musical score.
Meet Powerful Music Scanning Programs!
My favorite two music scanning publishers are Musitek who publishes SmartScore Pro X2 edition and MIDISCAN Lite which is bundled in Finale Professional and Neuratron who publishes PhotoScore Ultimate and PhotoScore Lite that is bundled in Sibelius. Both of them are highly recommended and note, there are very few competitors in music OCR which also include Cappella and SharpEye. Although MIDISCAN is a lite version and included free in the professional version of Finale, it is a rather functional product that digitizes printed music well without any cost beyond the cost of Finale. Both companies offer a 30-day free trial version for your evaluation of how user-friendly and accurate their OCR technology actually works. To illustrate this, try the "John Henry Test". As good as John Henry was at driving steel, the steam driver was 10 times faster. Even back in early scanning programs in the 1990’s, music scanning was still faster than hand-input. . Scott Campbell, a doctoral student at the University of North Texas and private music teacher in Fort Worth/Dallas, illustrates the importance of knowing the tricks and techniques with music scanning. “When I first started with Finale, I struggled a lot with scanning a score, but it’s because that I didn’t fully understand how to do simple fixes. I was completely discouraged and almost gave up. But now, with some relatively simple fixes that I did not know before, I am able to do it easily. It takes 5 to 10 minutes from putting [a score] in the scanner and having it on the screen ready to go in SmartMusic. It was insane before but now, I’m sold on it and doing it with my 70 private students!”
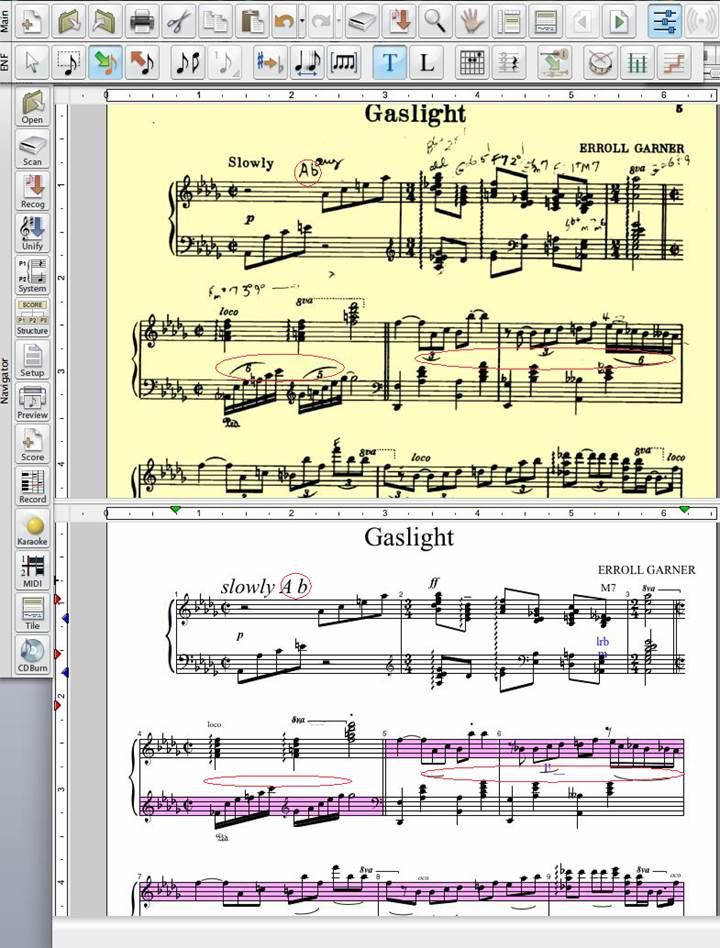
The top half of the screenshot is the original scanned page. The bottom half is what SmartScore X2 recognized. The few mistakes that were made are indicated with red circles. It took less than a minute to scan and recognize the page and another couple of minutes to correct it as accuracy is in the high 90th percentile. NOTE: Measures highlighted in pink indicate that there is a timing issue and may contain an error. Fixing the score of any mistakes such as this can be systematically edited and corrected in just minutes without questioning where the mistakes might be. And if you elect to playback the scanned music, you can follow the score to hear the mistakes first-hand.
Almost as important as accuracy is the ability to correct and modify the score after it is recognized. Their CEO, Chris Newell, summaries “that Musitek has invested many engineering man-years in music recognition. At the same time, we've spent an equal amount of effort in creating a powerful and easy-to-use notation editor within SmartScore which can transpose, extract parts or voices, print and playback complex as well as simple scores with Garritan virtual instruments.” SmartScore demo programs can be downloaded for free. They are fully functional. Only printing and file saving are disabled in their demo version that can be downloaded from: http://www.musitek.com/demos.html, MIDISCAN is a lite version of SmartScore and is included in versions of Finale. It basically is a powerful OCR program like SmartScore but is restricted to converting notes, rhythms, ties, key and time signatures. To compare product features, go to http://www.musitek.com/compare.html
PhotoScore by Neuratron is a worthy competitor to SmartScore for the past 18 years. It can handle scores up to 64 staves and 400 pages in length. It’s PhotoScore Ultimate 7 reads virtually all markings in printed music, and most in handwritten music. PhotoScore is particularly attractive to Sibelius users because
it offers automatic scanning and recognition, plus licensed Sibelius-style editing interfaces so seamless operation in Sibelius. Its accuracy can be nearly 99.5% on most PDF’s, printed music, versatile to read 4 and 6 line guitar tabutures, l, 2, 3 and 4 line percussion staves, as well as able to read hand-written manuscript and easy to use. You can compare their product features at http://www.neuratron.com/photoscore.htm.
Regardless of which music scanning software program being used, it will be important that the converted music file be saved in MusicXML for importing it into your favorite music notation program for further editing in Finale, Sibelius, Encore, etc. before getting into the editing section of this installment where the creativity begins in preparation for SmartMusic files.
Tricks, Tips and Techniques to Improve Scanning
A common misconception is that all scanners are equal for music OCR work. While it is true that most of all Canon, Epson or HP scanners can be used, their drivers need to be investigated for compatibility. To begin this investigation there is a list of recommended scanners beginning at $59 under "Scanners and Bundles" found under the Support tab of http://www.musitek.com/scanners-bundles.html
But another important factor is the choice of scanner drivers. Normally, there is no need to "download" drivers as modern plug & play computer systems install drivers automatically when the scanner is detected via USB. Scanning .TIF or PDF files from SmartScore's own interface is recommended because it will automatically set image resolution (dpi) and will create highly compressed multiple-page .TIF files up to 30 pages per file.
Scanners running under Windows usually load 2 kinds of scanner drivers: TWAIN and WIA. For Windows, we recommend choosing the "WIA" driver as the first choice. Once the driver is set, it never needs to be reset. For Mac, we recommend using Apple's "Image Capture app" for scanning which is included with all Macintosh systems. Musitek’s FAQ page includes the correct steps to follow when scanning outside of SmartScore (e.g. When scanning with Image Capture): http://www.musitek.com/HP_Mac_Scanning.html
One of the major break throughs that I have discovered is to create PDF document of your printed scores as the conversion process from PDF files into MusicXML files converts with more accuracy.
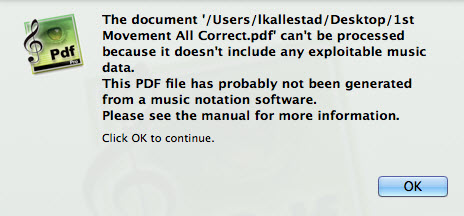
Important consideration for PDF to MusicSML conversion: The PDF must have originally been done in a music notation program or created in a music scanning program such as SmartScore or PhotoScore, not a graphic program or else it won't convert. See error message from "PDFtoMusicPro" conversion software:
If your score is using small sized fonts, try enlarging it slightly on your copy machine, maybe at 104% or larger. Always try to provide a cleaner/clearer copy of the original score if it is smudged or if the score appears to be faded. Also try varying your contrast and brightness controls on your music scanning program. Normally, most score’s scanning resolutions will be between 200 to 400 dpi. If the scanning resolution is set too high beyond 400, the recognition will be awkward because it will be identifying dots and stray marks on the score as well. Always attempt to erase any pencil marks on the score.
When saving MIDI, MusicXML, NIFF or Wave files, or exporting music to Sibelius/G7, you must ensure that the timing in each bar adds up to the current time signature. This is because any excess notes are clipped, and any missing ones are replaced with rests. This is an easy task if playback options are available.
Here’s a common question: “I am using PhotoScore with Sibelius, and find that transposing scores and triplets/tuplets are not transferred properly. Am I doing something wrong?” You need to be using at least version 3.0 (7.0 recommended) of Sibelius to import transposing scores and triplets/tuplets from PhotoScore. Contact Sibelius Software for upgrade details.
If ever you are not pleased with the formatting of your newly scanned music score when opening it up in your favorite notation program, try importing the newly converted MusicXML file directly into a template for your score which will ensure that the page layout will be similar to the original score or whatever your preference is. This extra step is very important because it will save you with editing the imported MusicXML file because it will immediately conform into your template design and ultimately save you editing time later.
The Two Titans of Notation Software Editing
Have no fear, the technology is here! Yet young or old, many of us tense up when the topic of music scanning or individualized instruction comes up. Yes, this is a cross-software process, but here in the year 2014, creating individualized SmartMusic assignments from printed music has become highly intuitive and easier than ever to navigate when editing in the two most used notation softwares: Finale and Sibelius. Scanning is indeed the fastest and most accurate way to turn printed music into a SmartMusic assignment, however, we must understand that even computers can make mistakes and that’s what we’ll be walking through here. Or if you’d like to personally customize your programs repertoire through edits made in rehearsal or the practice room, all the same tricks, tips, and techniques apply.
As mentioned earlier in the article, both PhotoScore and SmartScore Pro have their own sets of advantages and disadvantages when it comes to scanning software, but the short of it is that PhotoScore is a better software for composers/arrangers who want to scan handwritten music while SmartScore Pro is proprietary in recognizing printed music or published PDF’s. Regardless of the chosen software, the technology is here and readily available for whichever medium best suits your program.
After a scan is complete, there are two techniques in Finale and Sibelius (past the scanning software’s limited editing abilities) that will enhance projects and fix most, if not any problem derived from the scan: formatting and manual input. Now don’t be too scared, the rest to follow is an easy and comprehensive method of quick and common editing techniques. There are a variety of easy keystrokes and shortcuts that make editing a synch meaning you don’t have to learn or re-learn the entire program to correct mistakes for a final product of 100% accurate SmartMusic assignments. For broader coverage on all the topics covered in this section, please visit the online companion article at http://www.kuzmich.com/SBO0214.html.
Creating and editing in Sibelius can be done in several ways, based on your setup. If you are using a desktop, with a full-sized keyboard, you can take advantage of using the keypad to control the on-screen keypad. If you have a laptop, you will not be able to control the on-screen keypad as it only responds to the numbers from the keypad, not the numbers at the top of the keyboard, however, you could purchase a 3rd party USB or Bluetooth keypad to use. If you don’t want to have another item to carry around, you can learn a series of keyboard shortcuts and use the mouse/trackpad to select items from the keypad. While it may not be the fastest way to write music, it gets the job done and it is effective. Learning the shortcuts mean that you won't have to keep moving the mouse to the menu bar, so the mouse can stay on the keypad. With Sibelius 7, the pull-down menus that we've come to know have been removed and replaced with a very "Microsoft Word 2010" looking ribbon at the top of the screen. Even though the pull down menus are gone, the keyboard shortcuts have stayed the same which keeps me productive and gets my compositions done on time.
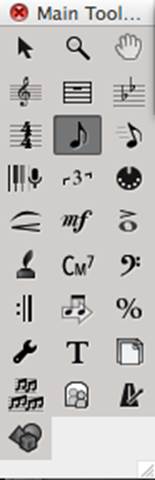
In Finale, the primary editing tools to fix common problems are found on the Main Tool Palette through the Selection Tool, Simple Entry Tool, and Text Tool shown
below
In Sibelius, editing can be done in several ways, based on your setup. The on-screen keypad can only responds to the numbers from a keypad, not the numbers at the top of the keyboard, however, you could use a 3rd party USB or Bluetooth keypad to take advantage of the ease in this tool. If you don’t want to have another item to carry around, you can learn a series of keyboard shortcuts and use the mouse/trackpad to select items from the keypad. While it may not be the fastest way to write music, it gets the job done and it is effective. Learning these shortcuts means that you won't have to keep moving the mouse to the menu bar, so the mouse can stay on the keypad. With Sibelius 7, the pull-down menus that we've come to know have been removed and replaced with a very "Microsoft Word 2010" looking ribbon at the top of the screen. Even though the pull down menus are gone, the keyboard shortcuts have stayed the same which keeps me productive and gets my compositions done on time.

The first trick is in formatting a piece of music to look like the original. Once a scan is imported, nearly every time, there will be a great deal of unnecessary text on the digital file. In order to get rid of this unnecessary or sometimes “random” text in Finale, begin by clicking the Text Tool, press command + A (select all), and then simply press delete. This will get rid of all the recognized text on the page. In Sibelius you may find the text ribbon to be helpful in this endeavor, but the select all function selects everything, not just text. When it comes to SmartMusic assignments, the only text that is necessary is the title and the composer. Both of these can be easily typed back in and customized by double clicking anywhere on the score (while still using the Text Tool in Finale, the Text ribbon in Sibelius) and typing in the prompted box. For more info on proper text and page formatting, please visit the online companion article.
Often times when there is a mistake from the scan, it will be from a smudge or something that the software tries to identify as a note or a rest. This may appear on the Finale file as out-of-range notes (in Finale 2012 and up) or as simply notes unintended in the music. To edit any and all notes in Finale, the Simple Entry tool is the tool to use. To navigate around the score in both Finale and Sibelius, simply press the left and right arrows to go from one note to another sequentially. When holding down command (Finale)/control (Sibelius) while pressing the arrows you will skip to the first beat of each measure making travel around the score faster. Once you have the desired note or rest highlighted, you may edit it in many ways. In Finale, to make a note sharp, press + (the plus sign), flat, press – (the minus sign), and natural, press n. These changes can be found on Sibelius’s keypad tool. You may also have to change a note’s duration if there’s something such as an incomplete measure. When your selected note is highlighted in Finale, press option + number from 1-8. You can find a list of durations in the “Cheat Sheet” on the online companion article. And lastly, if there is a note where there should be a rest or vise-versa, pressing r when the note/rest is highlighted will change it from one to the other. In Sibelius, simply press 0 when the note is highlighted to make it a rest and press a-g if you’d like to change a rest to a note.
Once all the editing is done, it’s time to export. In Sibelius, you must export your project as a MusicXML file that must then be imported into Finale. Then when using Finale, exporting to SmartMusic is as simple as clicking on the top menu File > Export > SmartMusic. Then, by following the on-screen instructions, you can easily pick and chose which staves are to be assessed and which ones are to be used for accompaniment and then you’re done! Once you have the .smp file, you may add it to your SmartMusic classroom as an assignment from which students can view, practice, learn, and grow from it.
SmartMusic: Three Steps to the “Pot of Gold!”
Through scanning and customized editing, it is possible to almost limitlessly expand a library as well as differentiated instruction to create a first-class teaching environment through SmartMusic. How can this be accomplished? First, identify select music scores that you deem important for your ensemble and ones that students need to be performing. Here’s a recipe for affirmative action to engage your students with accountable practicing.
Step One: Once you have scanned music scores and edited them into your favorite music notation program that can eventually import as finished MusicXML files, you are ready to import the fully edited score into Finale for conversion into SmartMusic.
Step Two: Create a Gradebook in SmartMusic by creating classes and have your students register to be a part of your school which needs to be registered with SmartMusic. You can set up your online classroom through smartmusic.com. The instruction in the program as well as on line make creating a gradebook and classroom simple and fast.
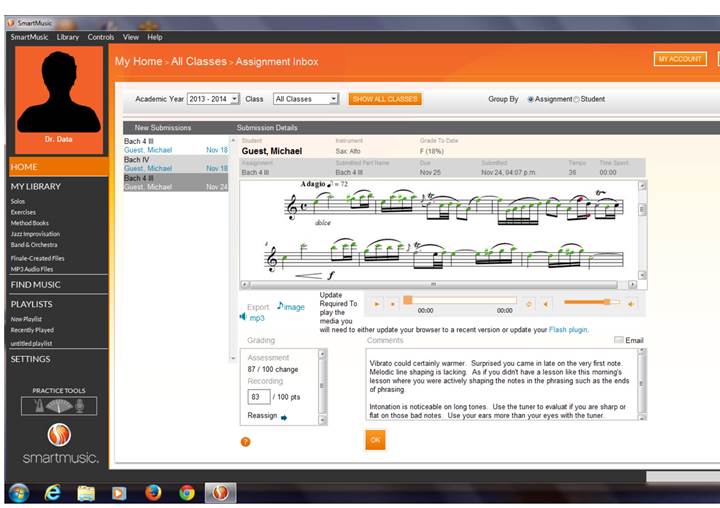
Step Three: Once in SmartMusic, specific assignments can be created and sent to all students in your class(es) with specific instructions, due dates to complete and miraculously, the student recordings are recorded and sent to the teacher’s grade book to listen to and further assess their musicianship as well as in providing additional feedback all electronically. Below is a screen capture illustrate a teacher’s viewpoint of a typical SmartMusic assignment. Note: you dictate the tempo(s) for all assignment so students can and will gradually perform their parts up-to-tempo in a series of assignments. Note: I always grade the student’s musicianship beyond the SmartMusic assessment of notes and rhythms which gives me good interaction with each student along with annotated comments about their musicianship (phrasing, articulations, dynamics, etc.).
How To Maximize Use of SmartMusic
Use the tuner for aural training
Import your upcoming concert repertory to practice with at a slower tempo in separate assignments so students over time can correctly perform the repertory at concert tempi.
Record yourself on SmartMusic and its $19.95 microphone and listen to it at a slower speed to hear the intonation differences between yourself and the duplicated SmartMusic melodic lines you created in the accompaniment.
Create loops to more accurately practice given measures and initially at slower tempi.
Send the teacher the SmartMusic recording(s) for teacher critiquing.
Bonus Time: Improve Intonation With SmartMusic!
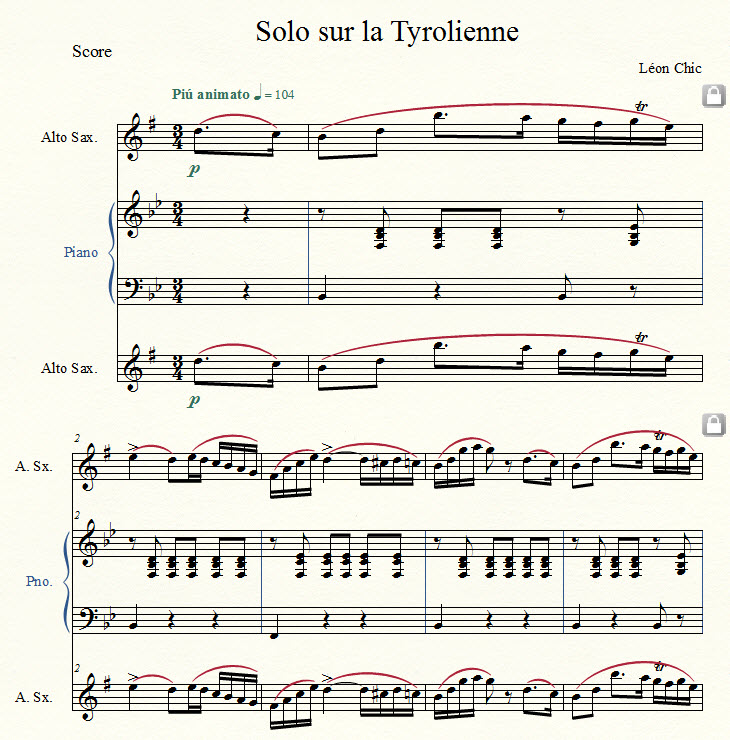
When I have students work on solo literature with piano accompaniment, I purposely duplicate the solo part in the accompaniment so when the student is practicing with it, they can more easily hear their intonation problems, especially on long tones. Once students start adjusting their out-of-tune long tones in solos, they are using their ears instead of their eyes which is unfortunate when relying on visual tuners. SmartMusic can simultaneously playback any motive, scale, melodic phrase and the student can actively be listening and adjusting their intonation with this interactive playback from SmartMusic in “real-time.” Below is a Finale score with the duplicated solo alto part duplicated below the piano accompaniment that offers much provides instantaneously intonation feedback in “real-time. Once you have finished your editing of the scanned score, converting the score to SmartMusic takes but just a few keystrokes
Final Touches:
To import the Finale score into SmartMusic only requires one keystroke in the export menu and then the teacher can import the newly created .SMP into SmartMusic for a new assignment. And the magic of all of this is that when the student logins into his or her computer, SmartMusic will download their assignment(s) automatically along with the newly created SmartMusic file for both practice and assessment without any additional teacher procedures.
Going Beyond Customized Creativity: The Ultimate Technology Experience!
The open-end architecture espoused in this installment provides the very environment for differentiated-instruction for teachers and their students like no other source of instruction in the entire music education profession. This innovative interaction between teacher and students is unique and gratifying because we are seamlessly dealing with objectivity of meaningful assessment, musical recordings with clear visual performance errors, and the opportunity to provide specific feedback for suggested musicianship improvements to enhance intonation, tone quality, articulations, dynamics, and more nuances beyond just assessing notes and rhythms played. The results can be significant for each student about how they practice over time to clearly improve their home practicing which can result in “perfect practicing” which is the very enigma of music education. And even better, it establishes a positive relationship for clear interaction between teacher and students for credibility that administrators and parents alike can recognize based on both interactive musical and statistical data accountability. While musicianship can be a nebulous target to teach to numbers of students in large ensembles, it is a realistic expectation that it can be objectively taught and implemented when the tools of performance technique and musicianship are ably incorporated into a systematic manner over time.
The creative use of Power-User music applications is the very engine of progressing from a printed score to differentiated-instruction with full accountability and customized options with an almost unlimited repertory to select from. Still not a believer? Strongly suggest you peruse this installment’s companion web edition at http://www.kuzmich.com/SBO0214.html for step-by-step illustrations and instruction of how scanned TIFF files are converted to PDF, MusicXML files and further edited into Sibelius, Finale or other notation programs and then imported into Finale and exported into SmartMusic files and assigned to individual student assignments. Note: 30-day trial versions are readily available from Musitek, MakeMusic, and Avid for your perusal for analysis that Power-User synthesis is a viable way to expand and enhance your teaching dramatically. Will it take some time and effort to master all of the ingredients offered in this installment? Yes, but it is time well-spent because the bottom-line is that your teaching will be significantly improved beyond your imagination as you have a marked influence over each and every student which is the essence of music education where the theme of Gestalt psychology dominates: “the whole is greater than the sum of its parts.” This process literally transforms individual Power-User applications into a synthesis of musical excellence with its inherent technology advances and implications to improve practicing to a more sophisticated level of professional credibility that better meets the expectations of 21st century instructional excellence and accountability.